In the world of virtualization, VM Import/Export is a powerful feature that enables seamless migration and deployment of virtual machines (VMs) across different cloud platforms.
One of the key functionalities of VM Import/Export is the ability to import a VM as an image, providing a flexible and efficient way to move your virtual environments. In this blog, we will delve into the process of importing a VM as an image using VM Import/Export.
How to Export image to OVF
- We need VM ware pro version
- Stop virtual machine first.
- Select your virtual machine which you want to export.
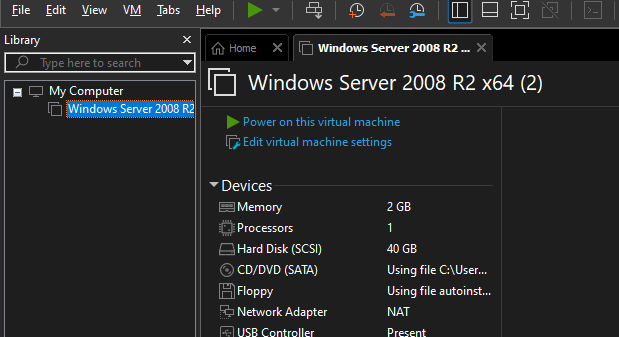
- Click on file.
- Click Export to OVF.
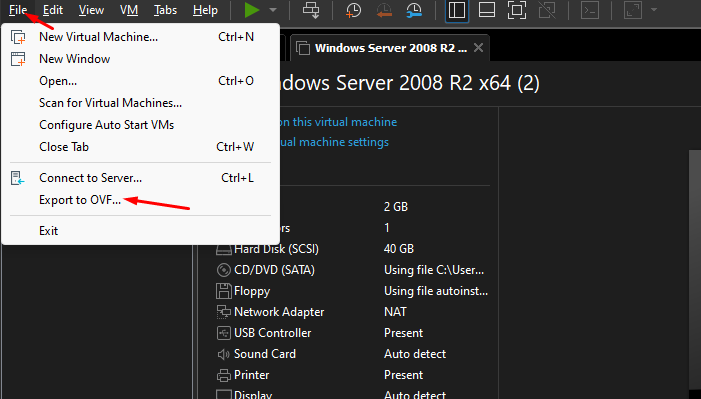
- Save you file using extensions .ova
Create IAM user
- Login into AWS account using IAM user.
- Navigate to IAM service
- Click on user from left panel.
- Create access key with permission “EC2FullAccess”, “S3FullAccess” and “IAMFullAccess”.
- Configure aws in your local system with above access key which you created.
Copy image in S3:
- Create S3 bucket.
- Copy image which you created from VM ware to S3 using command line.
Create policies
Trust policy
Create a file named “trust-policy.json” on your computer. Add the following policy to the file:
{

  "Version": "2012-10-17",

  "Statement": [

    {

      "Effect": "Allow",

      "Principal": {

        "Service": "vmie.amazonaws.com"

      },

      "Action": "sts:AssumeRole",

      "Condition": {

        "StringEquals": {

          "sts:Externalid": "vmimport"

        }

      }

    }

  ]

}
Role policy
Create a file named “role-policy.json” on your computer. Add the following policy to the file(Change your bucket ARN)
{

  "Version": "2012-10-17",

  "Statement": [

    {

      "Effect": "Allow",

      "Action": [

        "s3:GetBucketLocation",

        "s3:GetObject",

        "s3:ListBucket"

      ],

      "Resource": [

        "arn:aws:s3:::bucket-name",

        "arn:aws:s3:::bucket-name/*"

      ]

    },

    {

      "Effect": "Allow",

      "Action": [

        "ec2:ModifySnapshotAttribute",

        "ec2:CopySnapshot",

        "ec2:RegisterImage",

        "ec2:Describe*"

      ],

      "Resource": "*"

    }

  ]

}
Container policy
- Create a file named “containers.json” on your computer. Add the following policy to the file.
(Note: Change description, S3bucket, format and S3key. S3Key will be name of the file which you export from VM Ware. Description as you want. S3Bucket will be name of your bucket. In format change as per your file extension)
{

    "Description": "windows-server",

    "Format": "ova",

    "UserBucket": {

        "S3Bucket": "bucket-name",

        "S3Key": "file-name"

    }

  }

]
Import image in AMI
- Open command prompt as an administrator.
- Run the following command-
aws iam create-role --role-name vmimport --assume-role-policy-document "file://D:\trust-policy.json"aws iam put-role-policy --role-name vmimport --policy-name vmimport --policy-document "file://D:\role-policy.json"aws ec2 import-image --description "windows-server" --license-type byol --disk-containers "file://D:\containers.json"Note: Copy import task id.
aws ec2 describe-import-image-tasks --import-task-ids import-ami-06b81b71d570e1efaNote: Paste ami here which you get from above command.
- Wait till AMI will available in aws console. From there you can launch ec2 instance.
Conclusion
Importing a VM as an image using VM Import/Export empowers organizations with the flexibility and efficiency needed for cloud migration and VM deployment.
By following the steps outlined in this blog, you’ll be equipped with the knowledge to unlock the power of VM Import/Export and seamlessly import your virtual machines as images. Harness the potential of this feature and take your virtualization journey to new heights.
